MEMS3 Extended Firmware Memory Map –
Enables Map Switching on Freelander
Download
Link: https://andrewrevill.co.uk/Downloads/MEMSTools.zip
Using my MEMS Mapper you can now
rearrange the memory map of a MEMS3, gaining 8kB of firmware space for patched
and alternate maps.
I
was recently asked to looked at extending my dual-map live-switching system to
cover Land Rover Freelander ECUs. These were unable to implement the original
solution due to lack of free firmware EEPROM space.
In order to make
this viable, I’ve come up with a way of reorganising the address space of the
ECU’s EEPROM. The EEPROM is divided into sectors as shown in the diagrams
below. You can read any address at random. You can only write by converting
logical 1s to 0s, you cannot write a 1 the top of a 0. In order to write new
data, you have to erase a location first. But the chip only allows whole
sectors to be erased, not individual addresses. For this reason, it is
important that the address boundaries of the different areas used by the ECU
align with the sector boundaries used by the chip, so that we can for example
erase the map without erasing part of the firmware.
Later EU4
(Chinese/Continental MG TF LE500) ECUs used a different EEPROM chip (29F400
instead of 29F200) with twice the capacity and a different sector map. This
required a rearrangement of the address map used by the ECU. One of the changes
they made was to move the VIN and ZCS coding areas into the same sector as the
boot loader. This made them effectively inaccessible to direct reads (the ECU
firmware prohibits direct reading of the boot sector) and impossible to erase
using existing ECU functions (as all programming operations are managed by the
boot loader which is in the same sector, so erasing the coding would also erase
the running boot loader and permanently “brick” the ECU).
It occurred to me
that if I could find a way of moving the VIN and ZCS coding into the boot
sector on an EU3 ECU, I could the re-designate the coding sector as an
additional firmware sector (it follows on directly after the last firmware
sector in the EEPROM), giving an additional 8kB of firmware space. This would
be about twice what was needed in order to enable map switching on a
Freelander.
Doing this would
require a new, modified boot loader writing for the ECU. Nearly all of the
MEMS£ boot loaders across all of the range of part numbers are identical, other
than for a few bytes which code the part number and the boot loader ID. The
only exceptions are some very early ECUs where the boot loader appears to have
been still under development (and full of bugs!) and the very latest VVC 160
ECUs, where a new boot loader bootp039 was used. This means that I could
develop a single replacement
The Extended Firmware Memory Map
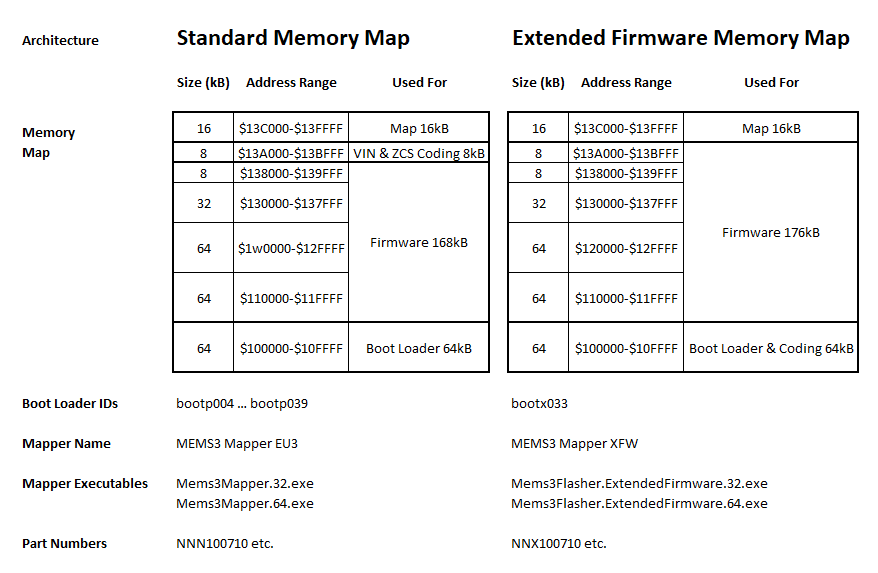
There are now two different memory maps for EU3 petrol MEMS3s
supported by MEMS Mapper.
Shown on the left is the Standard Memory Map. Shown on the right
is the new Extended Firmware Memory Map. In this memory map the VIN and ZCS
coding are moved into unused space in the boot loader sector of the EEPROM from
$100000-$10FFFF (as was done in the later EU4 Chinese Continental MG TF LE500
version of the ECU). The VIN coding starts at $10C000 and the ZCS coding starts
at $10D000. The EEPROM sector from $13A000-$13BFFF which was allocated to VIN
and ZCS coding now becomes another sector allocated to Firmware, extending the
available firmware space from 168kB to 176kB.
Modified Boot Loader
Each of these memory maps is supported by different (sets of) boot
loaders. The standard memory map uses a range of boot loaders with IDs
beginning “bootp”, e.g. “bootp004” … “bootp039” (a different boot ID is
generally associated with each part number, some part numbers e.g. NNN000160
came with more than one boot loader e.g. “bootp033” and “bootp039”). The
extended firmware memory map has one single boot loader “bootx033” which should
be useable with any petrol MEMS3 hardware and firmware combination and may
therefore be associated with multiple part numbers.
Each of the memory maps has its own version of MEMS Mapper, which
is built with a memory map to match that of the ECU. The standard memory map is
served by “MEMS Mapper EU3” with executable files “Mems3Mapper.32.exe”
(32-bit) and “Mems3Mapper.64.exe” (64-bit). The extended firmware memory map is
served by “MEMS Mapper XFW” with executable files
“Mems3Mapper.ExtendedFirmware.32.exe” (32-bit) and
“Mems3Mapper.ExtendedFirmware.64.exe” (64-bit). Version 7.35 Release or
later is required to support these features.
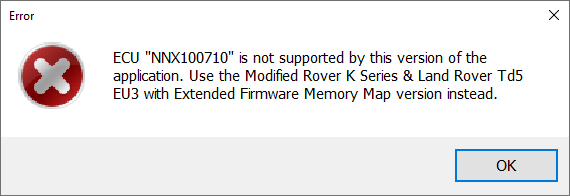
Each of these versions of MEMS Mapper will only allow you connect
and talk to ECUs with the appropriate memory map. To help enforce this, when
the boot loader is flashed the part number is automatically updated. The
standard memory map boot loaders set part numbers beginning with “NNN”, the
extended firmware memory map boot loader sets part numbers beginning with “NNX”
(the remaining 6 numeric digits remain unchanged).
In order to facilitate the flashing of the appropriate boot
loaders, during which the ECU may change from one memory map to the other, each
MEMS Mapper version allows you to connect to ECUs with the other memory map
when clicking “About ECU” and in the limited circumstances used to check that a
boot loader flash has succeeded. Under all other circumstances, connecting to
an ECU with the wrong build of MEMS Mapper will display an error message
similar to the one below:
Other than for some very small changes to the way the VIN and ZCS
coding is handled (the full previous coding history is not displayed in the
dialogs), the two versions of MEMS Mapper are identical in use and the ECU
will operate in exactly the same way with either memory map.
Firmware Changes
As well as changes to the boot loader, the different memory maps
require changes to the firmware. These are to support the firmware functions
for reading and writing VIN and ZCS coding records and to correct the runtime
checksum verification routines. MEMS Mapper EU3 with the standard memory map
saves projects in files with a “.MM3” extension. MEMS Mapper XFW with the
extended firmware memory map saves projects in files with a “.MX3” extension,
but has been built to allow it to open “.MM3” files from the standard memory
map version, as well as plain binaries from standard memory map ECUs. On
opening a project or binary, it automatically scans the firmware code to
determine which memory map it supports and if it finds a standard memory map
firmware it patches it on the fly to extended firmware memory map. This means
that all existing MEMS Mapper EU3 projects and reads from a standard memory
map ECU can be opened in MEMS Mapper XFW and flashed to an extended firmware
memory map ECU without any explicit changes being required.
Instructions
The process of converting a standard memory map ECU to use the
extended firmware memory map is therefore:
·
Start off using MEMS Mapper EU3 with the
standard memory map. This is required to connect to the ECU while
it is still has the standard memory map.
·
If you want to continue to use the firmware
and map currently installed, then read and save it now as the process of
flashing the boot loader will erase it.
·
Flash the extended memory map boot loader onto
the ECU. There are two alternative ways of doing this:
o By writing
a boot loader file directly. Select Tools | ECU Tools | Write Boot Loader File
from the menu. Confirm with Yes. When prompted with a dialog, select the file
“Rover K-Series - Extended Firmware - bootx033.boo” in the “Boot Loaders\Rover
K-Series\” subfolder within the MEMS Mapper installation folder. This will
erase the firmware and map, upload the new boot loader into the firmware area,
verify it (for robustness the write and verify are always done at 1x Speed so
take approximately 4 minutes to complete), then ask you if you want to proceed
with the update. Click Yes. A custom program is uploaded into RAM to perform
the boot loader update. DO NOT INTERRUPT THE PROCESS OR POWER THE ECU OFF
DURING THE UPDATE which usually only takes 2-3 seconds.
o By using a
boot loader update package. Open the file “Boot Update - Rover K-Series -
Extended Firmware - bootx033.mm3” in the “Boot Updates\Rover K-Series\”
subfolder within the MEMS Mapper installation folder. Click Write. Confirm
with Yes. The entire boot loader update process should now complete
automatically.
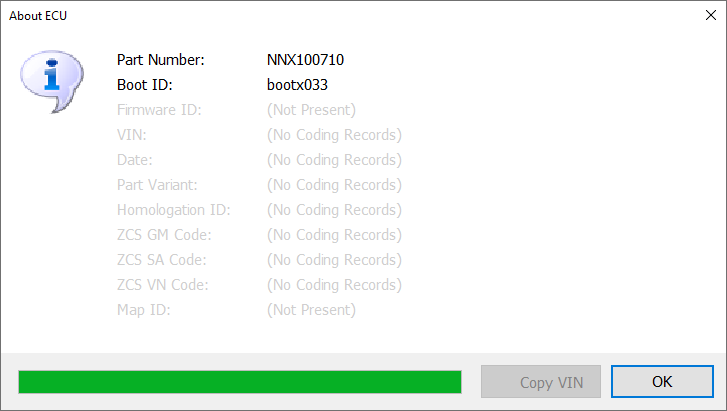
o Whichever
method you choose, you should see a dialog like this, confirming the new boot
loader and part number:
·
The ECU now has the extended firmware memory
map. So to continue to work with it, you need to switch to MEMS Mapper XFW
with the extended firmware memory map.
·
Open the firmware and map project you want to
flash back onto the ECU. This may or may not be the one you read off at the
start of the process. Opening the file in MEMS Mapper XFW will automatically
upgrade the firmware in the project to use the extended firmware memory map.
·
If you want to install a map switching patch,
install it into the project now.
·
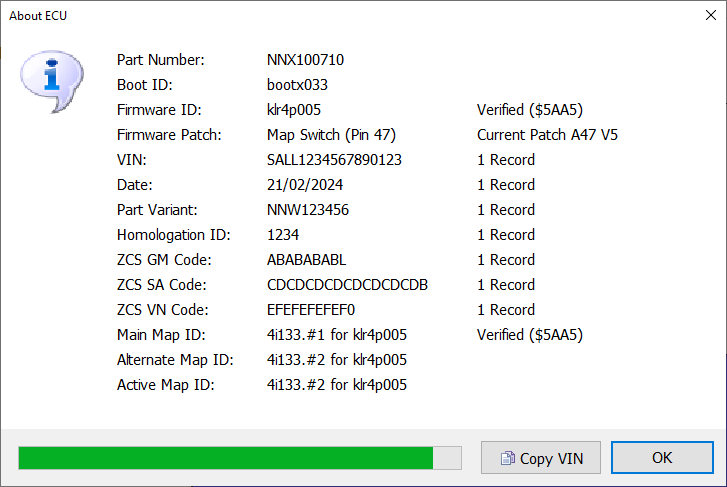
Write the project to the ECU in the normal
way. You should see a dialog similar to this:
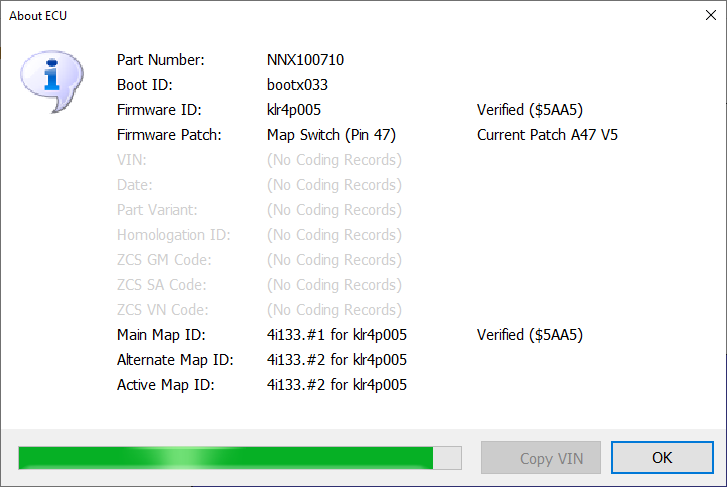
The example shown started as a Freelander ECU NNN100710 which would not have
supported dual map switching with the standard memory map, but which is now
able to support dual maps when converted to the extended firmware memory map as
an NNX100710.
·
You can then apply any VIN and ZCS coding.
These continue to operate in the normal way, despite the new storage locations:
If you ever want to convert an ECU back to the standard memory
map, use exactly the same process but start off using MEMS Mapper XFW with the
extended firmware memory map, write a standard memory map boot loader, then
switch to MEMS Mapper EU3 with the standard boot loader to continue.